Email Print
You can print to any Epson Email Print compatible printer from any device that can send email, such as your smartphone, tablet, computer, or mobile phone.
To use this service, you need to register your printer and account to Epson Connect first. If you have not registered yet, click the following link and follow the steps provided.
Sending an email
You can send an email from not only a computer, but also a smartphone, tablet, or mobile phone.
 |
Create an email and attach the photos or documents you want to print.
|
 Note:
Note:|
Text in the body of the email will print separately from the attachment.
You can set whether or not to print the body of the email in Print Settings on the User Page.
|
 |
Enter the printer’s email address and send an email.
|
You can check the printer’s email address using one of the following methods.
On the information sheet printed when you completed the setup for Epson Connect.
On the Printer List on the User Page.
On the printer LCD panel.
On the network connection report or the network status sheet.
Note:|
For more information on the network connection report and the network status sheet, see the documentation provided with the printer.
|
Notes when sending an email
Note the following when sending an email.
You can enter up to 100 printer's email addresses.
Cannot print with specifying a printer's email address in the Bcc field.
You can attach 10 files.
You can attach files up to a total of 20 MB including the body of the email.
The following file types are supported.
Microsoft Word (doc, docx), Microsoft Excel (xls, xlsx), Microsoft PowerPoint (ppt, pptx), PDF, JPEG, GIF, BMP, PNG, TIFF
Except for the body of the email, text files (plain text) cannot be printed.
Zip compressed files cannot be printed.
Short Message Services (SMS) unique to mobile phone providers are not supported.

Cancelling print jobs
You can cancel printing after sending a print job.
Note:|
If printing has already started, cancel the print job from the printer’s control panel.
You can cancel pending print jobs from the User Page.
|
From a printer’s control panel
Press the stop/cancel button on a printer’s control panel during printing.
Note:|
The name and location of the stop/cancel button varies by printer. See the documentation provided with your printer.
|
From the User Page
Sign in to the User Page, and cancel a print job from the Print Log.
|
Sign in to the User Page.
https://www.epsonconnect.com/user/ |
Note:|
If multiple printers have been registered, select the printer you want to configure from the printer list.
|
|
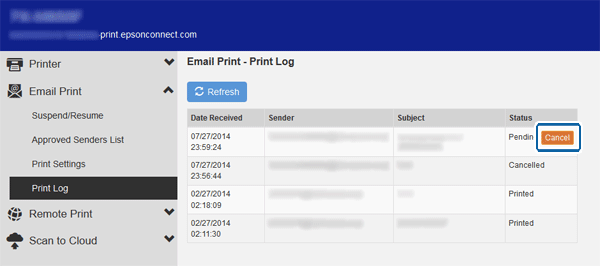
Select Print Log in Email Print from the menu on the left.
|
 |
The print job is displayed. Click or tap Cancel in the Status column.
|
 |
When the Status changes to Cancel, the print job has been canceled.
|
Enabling and editing the Approved Senders List
By enabling the Approved Senders List, you can allow only trusted senders access to your printer and block malicious emails. The Approved Senders List is disabled by default.
|
Sign in to the User Page.
https://www.epsonconnect.com/user/ |
Note:|
If multiple printers have been registered, select the printer you want to configure from the printer list.
|
|
Select Approved Senders List in Email Print from the menu on the left.
|
|
Select “Use Approved Senders List (Recommended)”.
|
|
Click or tap Add Address or Add address from Print Log.
|
Note:|
Your email address (username) is listed by default.
If you want to add an email address that is not in your print log or add a domain address, select Add Address.
If you want to add an email address that you have received an email from before, select Add address from Print Log.
|
 |
If you select Add Address, enter the email address or domain that you want to add.
|
If you select Add address from Print Log, select the email you received from the address you want to add.
Note:|
By adding a domain name, the printer can receive emails from email addresses that have the same domain.
When adding a domain name, make sure you include “@” (e.g. @epson.com).
You cannot add a domain from Add address from Print Log.
|
 |
Click or tap Add.
|
 |
Check that the address you added is listed in the Approved Senders List, and then click or tap Apply.
|
Note:|
If you want to delete a registered email address or domain name address, select the Delete column for the address you want to delete from the Approved Senders List, and then click or tap Apply.
If you want to disable the Approved Senders List, select “Anyone can send print jobs to this printer”, and then click or tap Apply.
|
Change Print Settings
When you select print settings, all emails are printed according to your settings. When multiple printers have been registered, you can select print settings for each printer.
|
Sign in to the User Page.
https://www.epsonconnect.com/user/ |
Note:|
If multiple printers have been registered, select the printer you want to configure from the printer list.
|
|
Select Print Settings in Email Print from the menu on the left.
|
|
Select the print settings you want to use.
|
Note:|
Print settings may differ depending on the model being used.
|
|
Click or tap Apply.
|
This setting is enabled the next time email is received.
Settings for email notifications
You can make email notification settings on the User Page.
If an error occurs from the sender’s side, a notification will automatically be sent to the sender, regardless of the settings.
If you receive an error notification, follow the steps provided to clear the error.
Sending email notifications to the printer’s owner
|
Sign in to the User Page.
https://www.epsonconnect.com/user/ |
Note:|
If multiple printers have been registered, select the printer you want to configure from the printer list.
|
|
Select Email Notification Settings in Printer from the menu on the left.
|
|
Select the notifications you want to receive.
|
|
Click or tap Apply.
|
The email notification setting is changed.
Sending email notifications to the sender of the email
You can change email notification settings for the sender of the email in Approved Senders List on the User Page.
|
If the Approved Senders List is enabled, select the check box in the Send notification email column of the email or domain address to which you want to send notifications.
|
If you the Approved Senders List is not enabled, select the check box in the Send print notification email to sender.
|
Click or tap Apply.
|