Remote Print Driver
By using Remote Print Driver you can print files on a remote printer over the Internet from a computer connected to the network. Make sure the following points before you can use this service.
To use this service, you need to register your printer and account to Epson Connect first. If you have not registered yet, click the following link and follow the steps provided.
Enable Remote Print on the User Page.
Remote printing is enabled when "Enable Remote Print" is selected from Print Settings for Remote Print on the User Page. Select "Enable Remote Print" if it has not been selected.
If you want to allow specified users to print, enter an access key and click Apply on the Print Settings screen, and then give them the key.
Make sure the printer is connected to a Wi-Fi/Ethernet network with Internet access, and not a USB cable.
Installing the Remote Print Driver and registering a printer - Windows
Download and setup the Remote Print Driver.
 |
Download Remote Print Driver from the following URL: https://support.epson.net/rpdriver/win/
|
 |
Double-click “Setup.exe” of Remote Print Driver.
|
 |
Select EPSON Remote Print, and then click OK.
|
 |
Read the license agreement, select Agree, and then click OK.
|
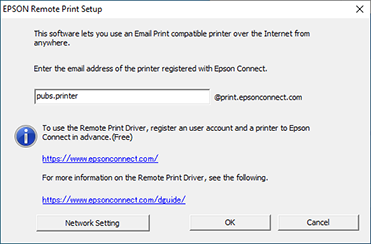
The printer registration screen is displayed.
 |
Enter the printer’s email address.
|
 Note:
Note:|
You can check the printer’s email address using one of the following methods.
From the information sheet printed when you completed the Epson Connect setup.
From the notification email sent when you completed the Epson Connect setup.
From the printer's network status sheet.
From the network status on the printer's control panel.
From the printer list on the Epson Connect User Page.
If you are not the owner of the printer and you do not know the printer’s email address, contact the owner of the printer.
|
When using a proxy server, click Network Setting, and then set the server settings on the displayed screen.

 |
Click OK.
|
 Note:
Note:|
If an access key has been set, the access key entry screen is displayed. Enter the key, and then click OK.
If you do not know the access key, contact the owner of the printer.
|
Installing the Remote Print Driver and registering a printer - Mac OS X
 |
Download Remote Print Driver from the following URL: https://support.epson.net/rpdriver/mac/
|
 |
Select Applications > Epson Software, and then double-click Epson Remote Print Utility.
|
 |
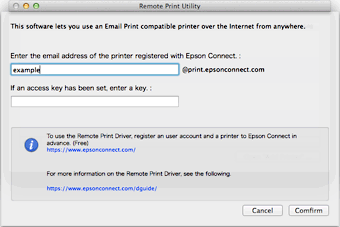
Enter the printer's email address.
|
 Note:
Note:|
If you want to register an additional printer, click + to open the window for entering an email address.
You can check the printer’s email address using one of the following methods.
From the information sheet printed when you completed the Epson Connect setup.
From the notification email sent when you completed the Epson Connect setup.
From the printer's network status sheet.
From the network status on the printer's control panel.
From the printer list on the Epson Connect User Page.
If you are not the owner of the printer and you do not know the printer’s email address, contact the owner of the printer.
If an access key has been set, enter the key.
If you do not know the access key, contact the owner of the printer.
|

 |
Click Confirm.
|
 |
Click Open "Add Printer" ... and then add the registered printer.
|
 Note:
Note:|
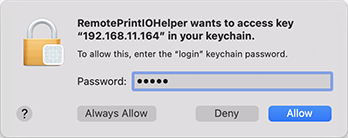
If you are using an authenticated proxy environment, the following screen may be displayed when printing.
In this situation, enter your computer login password, and then click [Always Allow] or [Allow].
 |
